- Published on
3d Aggregation pipeline
I wanted to give you some insight into my problem solving process with the most challenging problem I have encountered in my software engineering career. This problem requires perspective into multiple domains.
- Human Anatomy
- Three.js / React Three Fiber
- Blender 3d & Blender Scripting
- Python
- React
- Javascript
- Graphics Optimization techniques
- 3d Modeling
- 3d Texturing & Exporting
- 3d Rendering
- Problem Statement
- Solution #1 (Wrong Solution)
- Solution #2 (Wrong Solution)
- Solution #3 (Correct Solution)
Problem Statement
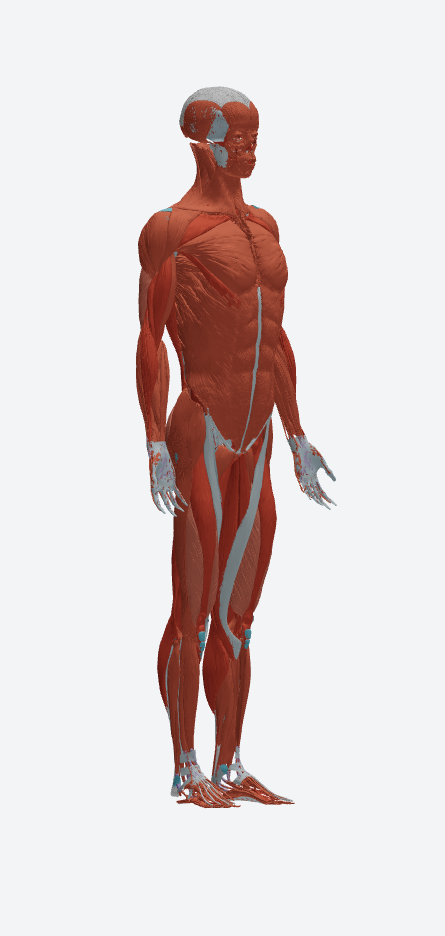
I have a 3d model of the human body with 200+ meshes ( objects that make up the model ) and I need to export my model to a web viewable format that accurately represents the original model.
There are numerous things that make this problem difficult.
High-resolution textures might look great up close but can significantly slow down real-time rendering, especially on less powerful devices or in web contexts.
To export a model with the original paint textures from a 3d editor like Blender, you need to
UV-UnwrapandBakethe material so that each mesh in the scene has the correct material mapping. This can make a very bloated file size because every mesh will have a png texture file. Its very difficult to create a single instance of a texture and apply it to multiple meshes.This layer of the anatomy is made up of
200+meshes, and each mesh has a unique name. There are 6 layers of the anatomy system. Totalling in1200+meshes.Unwrapping each mesh and assigning a material to each mesh is a very time consuming process.
- I have to
UV-Unwrapeach mesh individually and thenBakethe texture which can take 10-15 minutes per mesh. Its a very manual error prone process.
- I have to
I have to make sure the Model + Textures do not create a bloated file size.
After baking, post-processing might be required to clean up any artifacts or errors.
Considering file format compatibility: Not all formats support all texture types or advanced material properties.
I have to consider the potential need for multiple texture maps (diffuse, specular, normal, etc.), multiplying the effort for each mesh.
Solution #1 (Wrong Solution)
Uv-Unwrap and assign materials to each mesh
Unwrap everything in blender and make textures onto the GLTF Export. Below is the process that illustrates the complexity of this laborious process.
Step 1 - Uv-Unwrap


Step 2 - Bake Textures


Step 3 - Export GLTF with Draco Compression


Step 4 - Clean and Aggregate Meshes in the Blender Scene
import bpy

# Create a set to track used mesh data names
used_mesh_names = set()

# Iterate through all objects in the current scene
for obj in bpy.context.scene.objects:
    # Check if the object is of type 'MESH'
    if obj.type == 'MESH':
        # Duplicate the mesh data block
        mesh_copy = obj.data.copy()
        # Create a new name based on the object's name, replacing dots with underscores
        new_name = obj.name.replace('.', '_')
        # Check if the name has been used already, append a suffix if needed to ensure uniqueness
        suffix = 1
        while new_name in used_mesh_names:
            new_name = f"{obj.name.replace('.', '_')}_{suffix}"
            suffix += 1
        # Set the mesh data name to the new name
        mesh_copy.name = new_name
        # Assign the new mesh data block to the object
        obj.data = mesh_copy
        # Add the new name to the set of used names
        used_mesh_names.add(new_name)


# Iterate through all objects in the scene
for obj in bpy.context.scene.objects:
    # Check if the object name ends with '.g'
    if obj.name.endswith('.g'):
        # Unlink the object from the scene
        bpy.context.collection.objects.unlink(obj)
Solution #2 (Wrong Solution)
Create textures during Runtime execution of manually assigned meshes
An alternative approach I considered involved dynamically generating textures in Three.js and applying these to each mesh during runtime. The idea was to create a texture in Three.js and then programmatically assign it to each mesh as the model loads.
However, this solution has its own set of challenges that make it equally error-prone as the first method. Specifically, I would have to manually navigate through hundreds of meshes for every anatomical layer, assigning textures one by one. This not only amplifies the scope for errors but also becomes a tedious and time-consuming task.
const CATEGORIES = {
    muscle: {
        // light red level 4
        colorRange: [ "#FF8D71"],
        ignore: ["sheath"]
    },
    tendon: {
        // light purple
        colorRange: ["#33A1C9", "#71C4E1"],
        ignore: ['sheath']
    },
    // ...more categories
};

const COLOR_MAPPING = {
    left_arm_muscle: "#A123F4",
    right_leg_tendon: "#EFA321",
    Fibularis_longus_muscle_1: "#EAEAEA",
    // ...more color mappings
};
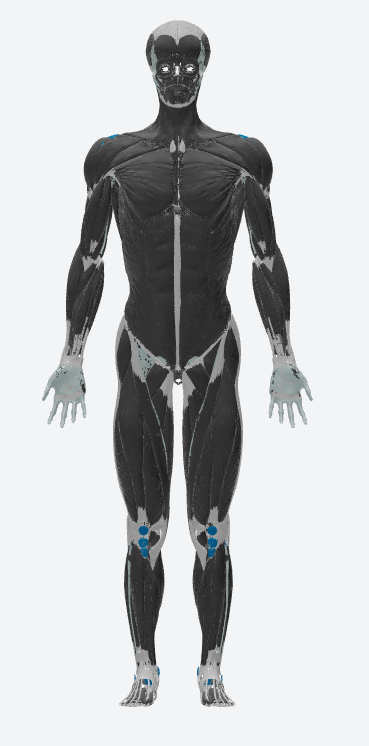
Solution #3 (Correct Solution)
I created a script that goes through my blender scene.
- Takes all the available materials.
- Finds any Mesh that has that material.
- Aggregates the meshes with the same material and assigns them a color.
- The list of the meshes that have the particular material will be exported into a JSON file.
- I then will map over the folder which contains the JSON file and assign the color to the mesh before the model is loaded.
This method is robust, allows me to make mistakes and repeat the process very quickly. I can also easily change the color of the mesh by changing the color in the JSON file. Pros
- Performant
- Doesn't create bloated GLTF files with 100s of textures.
- Doesn't require me to create textures during runtime execution.
- Doesn't require me to manually assign textures to each mesh.
- Doesn't require me to manually unwrap each mesh.
- Doesn't require me to manually bake each mesh.
- Doesn't require me to manually clean and aggregate meshes in the Blender scene.
- Doesn't require me to manually assign each color a mesh in Three.js.
- Easy to change colors
- Easy to add new meshes
- Robust and repeatable
- Easy to debug
Step 1 - Create a script that aggregates the meshes with the same material and assigns them a color
import bpy
import json

# Define the target material name and its associated color
target_material_name = "Trapezius"
material_color = "#FF8D71"

# Dictionary to store the mesh names with the associated color
meshes_with_material = {}

def transform_name(name):
    # Remove the .l or .r suffix
    name = name.replace('.l', '').replace('.r', '')
    # Replace spaces with underscores
    name = name.replace(' ', '_')
    return name

for obj in bpy.data.objects:
    if obj.type == 'MESH':
        for slot in obj.material_slots:
            if slot.material and slot.material.name == target_material_name:
                # Transform the name
                transformed_name = transform_name(obj.name)
                # Assign the color to the object's name key in the dictionary
                meshes_with_material[transformed_name] = material_color
                break


output_file_path = bpy.path.abspath('//Trapezius.json')

# Save the dictionary to a JSON file
with open(output_file_path, 'w') as outfile:
    json.dump(meshes_with_material, outfile, indent=4)

print(f"Mesh names with the material saved to {output_file_path}")
Step 2 - Map over the folder which contains the JSON file and assign the color to the mesh
const MuscularContext = require.context('./Color/Muscular', false, /\.json$/);

const COLOR_MAPPING = contexts.reduce((accContext, currentContext) => {
    return {
        ...accContext,
        ...currentContext.keys().reduce((accKey, key) => {
            return { ...accKey, ...currentContext(key) };
        }, {})
    };
}, {});
Output